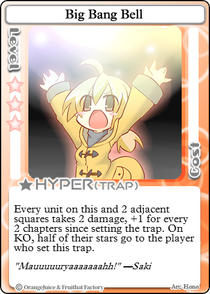
Effect
Saki's Hyper is Big Bang Bell. When used, a preview of the card's range will be shown to the player, and the player will be prompted to confirm their trap placement. If No is selected, the card will not be used and the player will return to card selection. If Yes is selected, this Trap card is set on the player's current panel.
When this card is triggered, it will deal damage to the affected unit as well as all non-KO'd units within a 2-panel radius. The amount of damage is equal to 2 plus an additional 1 damage for every 2 chapters that have passed since it was set. If any unit is KO'd by this effect, half of their stars are given to the player. This can also affect the player.
Strategy
Big Bang Bell is one of the best trap cards in the game, dealing massive punishment to opponents and potentially high gain for the player, all for the low price of 0 stars. The player also has the added bonus of being immune to the trap themselves as they will simply regain their own stars. As a result of this, the Hyper is relatively safe to drop on any panel, and the player should prioritize placing it as soon as possible to allow the damage output to grow. The Hyper is also potentially the most damaging card in the game with theoretically infinite damage output. As a trap, the Big Bang Bell has a variety of uses, and similar to has the advantage of creating unease and uncertainty among opponents as any trap set by Saki could be her Hyper. As to be expected, one of the most popular ways the Hyper is generally at it's best when set on an opponent's ![]() Home panel as not only can it deny an opponent from attempting to win the game, but it can also stop both Wins and Star Norma by KOing the opponent. In contrast, it may be smarter to leave Big Bang Bell on a lesser-traveled path to catch opponents by surprise in the late game. It is best to let the bell gain damage and then influence players to take the path where the trap is by placing more traps on the opposing pathway. Field events like can quickly make opponents forget about the Hyper's location if it was set randomly, and cards like can quickly make the trap's location confusing. Big Bang Bell also works well in decks with considering that both take time to charge. This occasionally leads to players stepping on well-charged Big Bang Bells thinking they are well-charged Piggy Banks, especially if the player set the Hyper on their own
Home panel as not only can it deny an opponent from attempting to win the game, but it can also stop both Wins and Star Norma by KOing the opponent. In contrast, it may be smarter to leave Big Bang Bell on a lesser-traveled path to catch opponents by surprise in the late game. It is best to let the bell gain damage and then influence players to take the path where the trap is by placing more traps on the opposing pathway. Field events like can quickly make opponents forget about the Hyper's location if it was set randomly, and cards like can quickly make the trap's location confusing. Big Bang Bell also works well in decks with considering that both take time to charge. This occasionally leads to players stepping on well-charged Big Bang Bells thinking they are well-charged Piggy Banks, especially if the player set the Hyper on their own ![]() Home.
Home.
The Hyper is not without its disadvantages though. As a trap card, Big Bang Bell is directly countered by and , as well as indirectly countered by if the opponent gets the card. Like all traps, the Hyper is also opponent-reliant, making it rather unreliable, and while this can make the Hyper extremely strong, it will be for naught if the opponent misses it. The player will also not be able to start using the Hyper until Norma 3, which gives the Hyper a late start unless is used. Some opponents will also purposely head toward their ![]() Home panel as quickly as possible if they believe the player set Big Bang Bell on it. By doing this, they will activate it before its damage output becomes lethal, thus countering its star loss effect.
Home panel as quickly as possible if they believe the player set Big Bang Bell on it. By doing this, they will activate it before its damage output becomes lethal, thus countering its star loss effect.

